Reed Switch Motor With Transistor
Difficulty level: 2 (simple, but requires the use of a soldering iron)
Kits covered: Kits #5,8
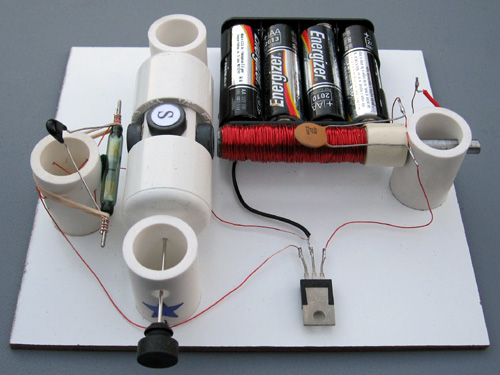
The reed switch motor is one of the simplest motors and works very well under low
voltages. However, on high voltages a spark may appear between the reed switch
contacts. This significantly reduces the lifetime of the motor. A spark is created
because the reed switch is connected
directly to the electromagnet, which is an inductive load. Size
of the spark depends on the diameter and amount of wire in the coil.
There are several ways to address
this problem. Usually the best results are achieved by separating the reed
switch from the inductive load. The motor described on this page uses a
transistor for this purpose. You may take a look at how easy it is to assemble this motor from the kit.
A transistor is a small electronic device
invented in 1947 by Shockley, Bardeen, and Brattain. Almost all of the
transistors today are made from silicon. Pure silicon does not conduct
electricity. Therefore boron atoms are added to silicon to create a P-type
semiconductor (positive), and phosphorus atoms are added to silicon to create an
N-type semiconductor (negative). A transistor consists of a stack of three
layers. The arrangement, PNP or NPN, determines which way the current
flows.
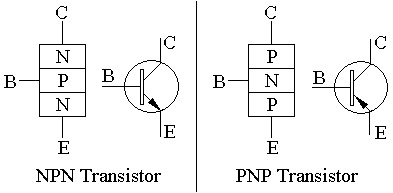
Transistors have three leads,
known as base (B), emitter (E), and collector (C). A very small emitter-base
current allows a much larger collector-emitter current to flow. Therefore
transistors may amplify the signal, or act as a switch. The switching ability of
PNP power transistors is used in these motors, but NPN transistors may be used
as well.
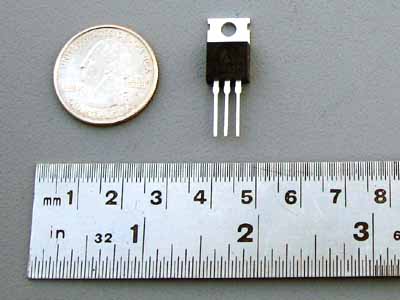
This is how power transistor looks like:
It is important to select the
transistor with maximum electrical ratings significantly higher than the
electrical consumption of the motor. For example, the motors described on this
site may experience peak current over 1A at 6V. Usually this happens when the
rotor is stalled and the transistor is open. You should not leave the motor in
this state as it may destroy the transistor. When the rotor spins with a proper
speed the transistor turns on and off, and the average current flowing through
the transistor is about 10 times smaller.
If the collector current through
the transistor is high, the transistor may get extremely hot and burn the
fingers if you touch it. A heat sink (a special metal piece attached to the
transistor) could be used to dissipate heat. Normally, the motors described on
this site do not need it, but you may still add a heat sink if necessary.
Some motors require the
transistors that are more sensitive. For that purpose certain kits use so called
Darlington transistors. Darlington transistors are actually two transistors in
one case where the second and more powerful transistor amplifies the signal from
the first transistor. Darlington transistors look the same as regular
transistors.
From the engineering point of
view (according to different electrical diagrams found in books on
electronics) some of the transistor circuits shown on this site may require
additional elements, such as a resistor, connected to the base of the transistor
(which limits the base current); a protecting diode, connected to the
inductive load; etc. The designs on this site represent the most simple
circuits. However, all of them were tested extensively and proved to be very
reliable and worked very well.
During the experiments Stan found
that one additional element helped to prolong the life of the transistor motor.
It is a capacitor connected to the ends of the electromagnet. The capacitor
helped to smooth the voltage spikes that occur at the moment when the contacts
of the reed switch connect or disconnect. It is not required to attach this
capacitor for the motor to work.
You can find additional
information about transistors and their usage in books about electronics and on
the Internet (see Links).
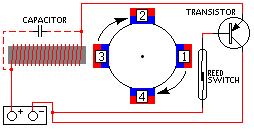
This is how the motor works:
- When magnet #1 gets close to the reed switch, the two contacts inside the glass tube get magnetized and touch each other. A small current flows through the base of the transistor. The transistor opens, and allows a bigger collector-emitter current to flow through the electromagnet. The electromagnet pushes magnet #3 away.
- When the rotor spins away, the reed switch demagnetizes and the contacts move back to their original position. Since there is no more current flowing through the base, the transistor turns off. This disables the electromagnet.
- The rotor continues to spin due to inertia until magnet #2 gets in working range of the reed switch. It becomes magnetized again and its contacts connect together. The transistor opens and allows a current to flow between the collector and emitter. The electromagnet turns on, and pushes magnet #4 away. This process continues until the power is disconnected.
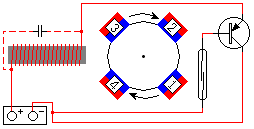
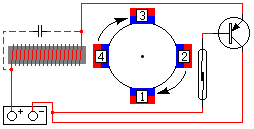
This motor can be built from the Kit#5.
Complete instructions
are provided. However, if you decide to design this motor yourself, you may order
only the parts you need (transistor, reed
switch, magnet wire, magnets, heat sink).
You may add a speed control unit
to this motor. It will allow you to control and change the speed of the motor
from a complete stop to maximum speed, which may be 10-25% greater than the
normal speed of the motor. The speed control unit is described at the How It Works: Reed Switch Motor
section.
The speed control unit, which
contains only few additional parts, is included with experimentation
kit #1 or #3. Complete assembly instructions
describing an easy way to orient the speed control magnet are provided.