Build It Yourself
The following instructions are for people who
want to build the reed switch motor themselves.
If you want to purchase an inexpensive kit,
that allows you to assemble a much better motor and do more experiments, or need
some parts for this project – click here.
If you want to understand how this motor works,
click here.
![]() Printer-friendly assembly instructions in pdf format.
Printer-friendly assembly instructions in pdf format.
You will need these materials to build the motor:
- One reed switch – a general purpose reed switch may be used; however, if you are a novice it is strongly recommended to use large and powerful reed switches in your design. Smaller reed switches are extremely fragile, may not last long enough, and it is very difficult to connect them without soldering their leads. You may order hard to find heavy duty reed switches that are appropriate for beginners at our site.
- Two magnets. You can buy ceramic magnets from Radio Shack (diameter: 1/2", height: 1/4"). They sell grade 1 magnets for $1.99. We offer a pair of grade 5 magnets for $1.50. Higher magnet grade means higher magnetic flux, or strength, and therefore more reliable reed switch operation.
- Spool of magnet wire. You can get this at Radio Shack – they sell a set of three different spools for $6.59. Use the medium gauge wire; you will need almost all of it. You may also order a spool of proper wire at this site for $3.95.
- You may add a ZNR to your motor. This is a little part that absorbs a spark inside the reed switch and prolongs the life of the motor significantly. The ZNR is not required for the motor to operate but if you want to make much more reliable motor you may also order the ZNR here.
- A cork from a bottle of wine or champagne. You do not have to drink it to get the cork!
- Needle. It must be longer than the cork.
- Battery. 6 Volts lantern battery is a good choice as they last longer and it is easy to connect them, however even 1.5 volts battery may be sufficient enough to provide reliable operation.
- Two push pins.
- Tape. Electrical is advised, but scotch or masking tape is fine.
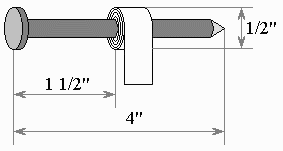
- Long nail (3" – 6", 4" recommended) for electromagnet.
- Duct tape.
- Glue.
- Two matchboxes.
- A piece of firm cardboard or similar material for the base.
- A small piece of fine sandpaper, or a sharp knife. Used to remove the insulation from the wire.
- Two sturdy hardcover books or cardboard boxes.
- Optional: pliers, a small nail, and a lighter.
Read all instructions carefully and check the Safety Rules before you start!
- Take a nail and wrap it with tape to make a layer about 1/2" (12mm) thick in diameter at the distance of 1 – 2" (3-5cm) from the head of the nail.
- Cut a piece of wire 10" (25cm) long. Leave it for now - you will need it later. All
remaining wire on the spool should be used to wrap around the area between the tape and the
head of the nail.
- Tape one end of wire leaving about 10" (25cm) open.
- Wind all the wire in one rotational direction (either clockwise or counterclockwise) moving back and forth along the nail. Try to be as accurate as possible. Do not let the wire slide off the end of the electromagnet.
- Tape the second end of the wire using the same tape. Both open ends of wire should be about 10" (25cm) long.
- Clean about
1 1/2" (4cm) of the wire tips with fine sandpaper or a sharp
knife to remove the insulation.
Test the electromagnet! Connect one wire to "+" and another wire to "-" of the battery. If electromagnet is assembled correctly the head of the nail should attract metal objects such as paper clips, small nails, knife blade, etc.
- Tape the open end of the nail to the matchbox.
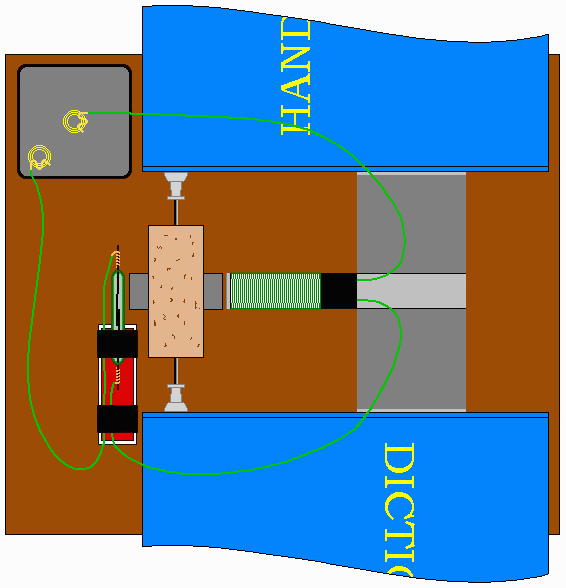
- Using the duct tape attach the matchbox to the board as shown below.
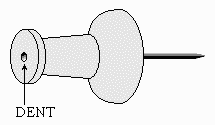
- Make a small dent in the middle of each pushpin. Use one pushpin to make a dent in the other; or hold a small nail with pliers, heat it up using a lighter, and press the hot sharp end of the nail into the center of the pushpin.
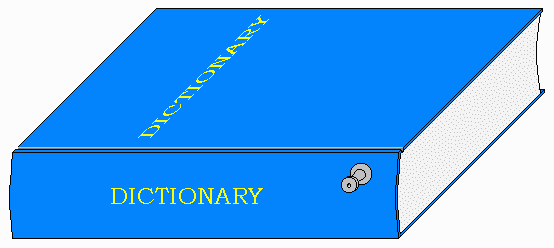
- Insert two pushpins into two hardcover books or cardboard boxes as shown below. The center of each pushpin should be at the same level from the base surface as the center of the electromagnet.
- Take the cork and stick the needle through the center on one side and make sure that it comes out in the center as well. Try to be accurate, redo this step if necessary. Balance of the cork is very important as it affects the motor performance.
- Find the same poles on the magnets and mark them. Same poles (North – North, or South – South) repel, while different poles attract. Find two repelling sides – they should face outside. Glue the magnets to the opposite sides of the cork. It really does not matter if North or South poles are facing up as long as they are the same.
- Take the 10" (25cm) piece of wire (see step #2) and remove about 1 1/2" (4cm) of insulation off both ends. Wind one bare end tightly around an outside contact of the reed switch. Tape the reed switch to a matchbox as shown below.
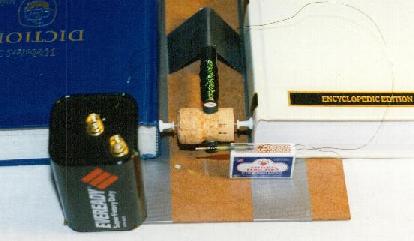
- Put the stator (the electromagnet on the base and the books with the pins inserted) and the rotor (the cork with the needle and attached magnets) together as shown below. Position the electromagnet as close as possible to the permanent magnets on the rotor. Adjust books position to allow the rotor to spin freely without hitting the electromagnet.
- Before connecting everything together connect both wires from the electromagnet to the battery. If the electromagnet doesn’t repel the permanent magnets away, switch the wires. When it repels, disconnect one wire and connect it to the reed switch. Connect the other end of the reed switch to the battery as shown on the picture above.
- If you want to experiment with higher
voltages or make much more reliable motor you may add a ZNR. The ZNR is a small
electronic part that absorbs the spark inside the reed switch. Connect the ZNR
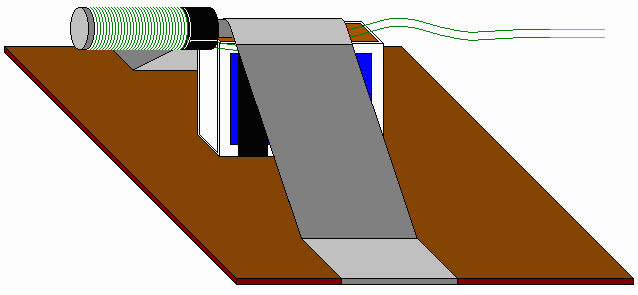
parallel to the reed switch as shown on the next picture:

The ZNR is not required for the motor to work. Higher voltage makes the motor run faster but even with the ZNR it is not recommended to exceed 15 Volts.



If you bring the reed switch close to the magnets the motor should start working immediately.
If it doesn’t work check all of the connections – it is important to clean the insulation thoroughly; make sure the battery is new and connected properly; move the books to
allow free rotation. If it still does not work – check out the
Troubleshooting section.
CONGRATULATIONS! You have finished assembling this electric motor! Click here for Experiments and Applications.
