Troubleshooting
This is a recommended troubleshooting sequence for all motors:
- Make sure that your rotor spins freely if you give it a slight push with your hand.
- Test your electromagnet. Connect one 1.5V
battery to electromagnet wires briefly. The electromagnet should push the
closest magnet on the rotor. The rotor should turn 45� if you have 4 magnets
on a rotor, or 90� if you have 2. If it does not - switch the wires.
If your electromagnet does not work, it may be shorted. Sometimes re-winding the electromagnet may solve this problem. - Select the troubleshooting table that
corresponds to the motor you are trying to assemble and find your problem,
cause and solution:
Reed switch motor you built yourself
Kits #1-4
Kit #5
Kit #6
Kit #7
Conventional motor (Beakman's motor kit)
Reed switch motor you built yourself:
|
Problem |
Cause |
Solution |
| Newly assembled motor does not work: rotor does not spin. | Rotor is in a "dead spot" – the magnet is outside of the reed switch working range. This usually occurs with 2 magnet rotors. | The rotor will not start spinning on its own. Give it a slight push. |
| Rotor is jammed. | Find the exact cause and fix the problem. Moving the books may solve the problem. | |
| Electromagnet attracts the magnets instead of repelling them. | Switch the battery connection wires. | |
| Bad connection in wiring. | Thoroughly clean the wires to remove the insulation. | |
| Reed switch is too far from the rotor. | Move reed switch closer. | |
| Reed switch does not function when a magnet passes near its center. | The most sensitive part of the reed switch is not in the middle of it, but more to the side. Move the reed switch left or right. | |
| Your reed switch may not be sensitive enough, or it is defective. Get a different reed switch. | ||
| Your magnets may not be strong enough to activate the reed switch. Get magnets with stronger magnetic flux. You may also try to attach an extra magnet to each magnet on the rotor. | ||
| The battery is dead or battery voltage is low. | Get a new battery. Increase the voltage by connecting an extra battery in series. | |
| One of the magnets is not repelling. This could happen if you built the motor yourself and did not use marked magnets as those sold at this site. | Tear this magnet off and glue it upside down. All of the magnets should have the same pole facing outside. | |
| Motor worked fine for a while but then stopped working. | The battery is dead or battery voltage is low. | Get a new battery. Increase the voltage by connecting an extra battery in series. |
| If you use high voltage (6V or higher) you can see a blue spark inside of the reed switch. Sometimes it may weld the contacts together. | Disconnect the battery. Flick the reed switch tube slightly. In most cases it will fix the problem temporarily. Afterwards it is recommended to lower the voltage or connect a ZNR parallel to the reed switch. You may also need to replace the reed switch. | |
| The electromagnet gets hot. | Not enough wire used for the electromagnet. | Make sure that the electromagnet coil has enough wire. Use almost all the wire from the spool if you bought it here. Use all of the wire from the medium size spool if you bought it at Radio Shack. Otherwise use 40-60 ft (12-18m) of 26-28 gauge magnet wire (diameter 0.3-0.5mm). |
| Short connection inside the electromagnet. | Re-wind the electromagnet. It is better to use a new spool of wire, but sometimes the old wire may still work. |
|
Problem |
Cause |
Solution |
| Newly assembled motor does not work: rotor does not spin. | Rotor is in a "dead spot" – the magnet is outside of reed switch working range. Usually occurs with 2 magnet rotors. | The rotor will not start spinning on its own. Give it a slight push. |
| Rotor is jammed. | Find the exact cause and fix the problem. This may require breaking off the stands and reattaching them to the board. You may try to lubricate the axles with WD-40 or any other lubricant. | |
| Electromagnet attracts the magnets instead of repelling them. | Switch the battery connection wires. | |
| Bad connection in wiring. | Thoroughly clean the wires to remove the insulation. | |
| Reed switch is too far from the rotor. | Move reed switch closer. | |
| Reed switch does not function when a magnet passes near its center. | The most sensitive part of the reed switch is not in the middle of it, but more to the side. Move the reed switch left or right. | |
| The battery is dead or battery voltage is low. | Get a new battery. Increase the voltage by adding an extra battery. | |
| One of the magnets is not repelling. | Tear this magnet off and glue it upside down. All of the magnets should have the same pole facing outside. | |
| Motor worked fine for a while but then stopped working. | The battery is dead or battery voltage is low. | Get a new battery. Increase the voltage by adding an extra battery. |
| If you use high voltage (6V or higher) you can see a blue spark inside of the reed switch. Sometimes it may weld the contacts together. | Disconnect the battery. Flick the reed switch tube slightly. In most cases it will fix the problem temporarily. Afterwards it is recommended to lower the voltage or connect a ZNR parallel to the reed switch. You may also need to replace the reed switch. | |
| The electromagnet gets hot. | Not enough wire used for the electromagnet. | Make sure that the electromagnet coil has enough wire. Use almost all the wire from the spool. |
| Short connection inside the electromagnet. | Re-wind the electromagnet. It is better to use a new spool of wire, but sometimes the old wire may still work. | |
| If you need to disassemble the rotor… | This operation may require quite a bit of strength. Disassemble the rotor with a rocking motion as if trying to break it and at the same time pulling the ends out. |
|
Problem |
Cause |
Solution |
| Newly assembled motor does not work: rotor does not spin. | Rotor is in a "dead spot" – the magnet is outside of reed switch working range. Usually occurs if you tried 2 magnets on a rotor first. | The rotor will not start spinning on its own. Give it a slight push. |
| Rotor is jammed. | Find the exact cause and fix the problem. This may require breaking off the stands and reattaching them to the board. You may try to lubricate the axles with WD-40 or any other lubricant. | |
| Electromagnet attracts the magnets instead of repelling them. | Switch the electromagnet wires. | |
| Bad connection in wiring. | Thoroughly clean the wires to remove the insulation before soldering. Re-solder the connections. | |
| Reed switch is too far from the rotor. | Move reed switch closer. | |
| Reed switch does not function when a magnet passes near its center. | The most sensitive part of the reed switch is not in the middle of it, but more to the side. Move the reed switch left or right. | |
| The battery is dead or battery voltage is low. | Get a new battery. Increase the voltage by adding an extra battery. | |
| One of the magnets is not repelling. | Tear this magnet off and glue it upside down. All of the magnets should have the same pole facing outside. | |
| The transistor is connected incorrectly. | Make sure that you connected transistor leads according to the wiring diagram. | |
| The transistor was burnt and does not work. This may happen if you overheated it while soldering, connected it improperly, or had the rotor stalled on a high voltage. | Replace the transistor. | |
| Motor worked fine for a while but then stopped working. | The battery is dead or battery voltage is low. | Get a new battery. Increase the voltage by adding an extra battery. |
| The reed switch contacts are welded together. | Disconnect the battery. Flick the reed switch tube slightly. In most cases it will fix the problem temporarily. Afterwards it is recommended to lower the voltage or connect a ZNR parallel to the reed switch. You may also need to replace the reed switch. | |
| The transistor is burnt. | Get a new transistor and re-solder it. Try not to leave the motor stalled, this may be a reason the transistor was burnt in the first place. | |
| The transistor is getting too hot even when the motor works. | The rotor has too much friction. | Make sure that the rotor spins freely. You may add a heat sink to the transistor for better heat dissipation. You may also try to lubricate the axles with WD-40 or any other lubricant. |
| The reed switch stays on most of the time. | Move the reed switch farther from the rotor. You may add a heat sink to the transistor for better heat dissipation. | |
| The electromagnet gets hot. | Not enough wire used for the electromagnet. | Make sure that the electromagnet coil has enough wire. Use almost all the wire from the spool. |
| Short connection inside the electromagnet. | Re-wind the electromagnet. It is better to use a new spool of wire, but sometimes the old wire may still work. | |
| If you need to disassemble the rotor… | This operation requires quite a bit of strength. Disassemble the rotor with a rocking motion as if trying to break it and at the same time pulling the ends out. |
|
Problem |
Cause |
Solution |
| Newly assembled motor does not work: rotor does not spin. | Rotor is jammed. | Find the exact cause and fix the problem. This may require breaking off the stands and reattaching them to the board. You may try to lubricate the axles with WD-40 or any other lubricant. |
| Electromagnet attracts the magnets instead of repelling them. | Switch the electromagnet wires. | |
| Bad connection in wiring. | Thoroughly clean the wires to remove the insulation before soldering. Re-solder the connections. | |
| Intersecting connections in wiring. | After soldering check all the connections to make sure that they do not touch each other. | |
| Hall effect IC is too far from the rotor. | Move the Hall effect IC closer. | |
| Hall effect IC is facing the wrong poles. | Branded side of the Hall effect IC should face the South poles of the rotor magnets; or back side of the Hall effect IC should face the North poles. Change the Hall effect IC orientation or re-glue the magnets. | |
| The battery is dead or battery voltage is low. | Get a new battery. Increase the voltage by adding an extra battery. The lowest voltage for this motor is 4.5V, though sometimes it starts at 3V. | |
| One of the magnets is not repelling. | Tear this magnet off and glue it upside down. All of the magnets should have the same pole facing outside. | |
| Rotor is in a "dead spot" – the magnet is outside of the Hall effect IC working range. Usually occurs if you tried 2 magnets on a rotor first. | The rotor will not start spinning on its own. Give it a slight push. | |
| The transistor is connected incorrectly. | Make sure that you connected transistor leads according to the wiring diagram. | |
| The transistor was burnt and does not work. This may happen if you overheated it while soldering, connected it improperly, or had the rotor stalled on a high voltage. | Replace the transistor. | |
| The Hall effect IC is connected incorrectly. | Make sure that you connected the Hall effect IC leads according to the wiring diagram. | |
| The Hall effect IC was burnt and does not work. This may happen if you overheated it while soldering, connected it improperly, or used high voltage. | Replace the Hall effect IC. | |
| Motor worked fine for a while but then stopped working. | The battery is dead or battery voltage is low. | Get a new battery. Increase the voltage by adding an extra battery. The lowest voltage for this motor is 4.5V, though sometimes it starts at 3V. |
| The transistor is burnt. | Get a new transistor and re-solder it. Try not to leave the motor stalled, this may be a reason the transistor was burnt in the first place. | |
| The Hall effect IC is burnt. | Replace the Hall effect IC. | |
| The transistor is getting too hot even when the motor works. | The rotor has too much friction. | Make sure that the rotor spins freely. You may add a heat sink to the transistor for better heat dissipation. You may also try to lubricate the axles with WD-40 or any other lubricant. |
| The Hall effect IC stays on most of the time. | Move the Hall effect IC farther from the rotor. You may add a heat sink to the transistor for better heat dissipation. | |
| The electromagnet gets hot. | Not enough wire used for the electromagnet. | Make sure that the electromagnet coil has enough wire. Use almost all the wire from the spool. |
| Short connection inside the electromagnet. | Re-wind the
electromagnet. It is better to use a new spool of wire, but sometimes the old
wire may still work.
|
|
| If you need to disassemble the rotor… | This operation requires quite a bit of strength. Disassemble the rotor with a rocking motion as if trying to break it and at the same time pulling the ends out. |
|
Problem |
Cause |
Solution |
| Newly assembled motor does not work: rotor does not spin. | ||
| In the starting position the light from the LED reaches the phototransistor because the disk blade is not in the optointerrupter slot. | Make sure that in the starting position one of the blades is inside the optointerrupter slot and does not allow light from the LED to reach the phototransistor. While holding the magnets, slightly rotate the cap with the disk to find the proper disk blade position. | |
| Rotor is jammed. | Find the exact cause and fix the problem. This may require breaking off the stands and reattaching them to the board. You may try to lubricate the axles with WD-40 or any other lubricant. | |
| Electromagnet attracts the magnets instead of repelling them. | Switch the electromagnet wires. | |
| Bad connection in wiring. | Thoroughly clean the wires to remove the insulation before soldering. Re-solder the connections. | |
| Intersecting connections in wiring. | After soldering check all the connections to make sure that they do not touch each other. | |
| The battery is dead or battery voltage is low. | Get a new battery. Increase the voltage by adding an extra battery. The lowest voltage for this motor is 3V, though sometimes it may not start at this voltage. | |
| One of the magnets is not repelling. | Tear this magnet off and glue it upside down. All of the magnets should have the same pole facing outside. | |
| The optointerrupter is connected incorrectly. | Make sure that you connected the optointerrupter wires according to the wiring diagram. | |
| The optointerrupter was burnt and does not work. This may happen if you connected it improperly or used high voltage. Even a brief connection of the optointerrupter wires directly to the battery may destroy it. | Replace the optointerrupter. | |
| The transistor is connected incorrectly. | Make sure that you connected transistor leads according to the wiring diagram. | |
| The transistor was burnt and does not work. This may happen if you overheated it while soldering, connected it improperly, or had the rotor stalled on a high voltage. | Replace the transistor. | |
| The light from the LED reaches the phototransistor because the disk is semi-transparent. | Blacken the blades with permanent marker or glue additional pieces of opaque material, such as aluminum foil, to the blades. | |
| Motor worked fine for a while but then stopped working. | The battery is dead or battery voltage is low. | Get a new battery. Increase the voltage by adding an extra battery. The lowest voltage for this motor is 3V, though sometimes it may not start at this voltage. |
| The transistor is burnt. | Get a new transistor and re-solder it. Try not to leave the motor stalled, this may be a reason the transistor was burnt in the first place. | |
| The optointerrupter is burnt. | Replace the optointerrupter. | |
| The transistor is getting too hot even when the motor works. | The rotor has too much friction. | Make sure that the rotor spins freely. You may add a heat sink to the transistor for better heat dissipation. You may also try to lubricate the axles with WD-40 or any other lubricant. |
| The disk blades are too wide. (If you made a disk yourself or glued the pieces of opaque material to the blades) | Trim the blades with scissors. | |
| Dirt in the optointerrupter slot may interfere with the light beam. | Clean the optointerrupter slot. | |
| The electromagnet gets hot. | Not enough wire used for the electromagnet. | Make sure that the electromagnet coil has enough wire. Use all the wire from the spool. |
| Short connection inside the electromagnet. | Re-wind the electromagnet. It is better to use a new spool of wire, but sometimes the old wire may still work. | |
| The motor speed is too slow. | The disk blades are too narrow. | Make the blades wider by cutting the disk with wider blades or gluing 4 pieces of opaque material to the disk blades. |
| If you need to disassemble the rotor… | This operation requires quite a bit of strength. Disassemble the rotor with a rocking motion as if trying to break it and at the same time pulling the ends out. |
Conventional motor (Beakman's motor kit):
|
Problem |
Cause |
Solution |
| Newly assembled motor does not work. | ||
| The insulation on the coil ends is not removed correctly. | Carefully study step 3 of the assembly instructions. Pay attention to the pictures. Properly removed insulation leaves shiny copper on one end. Half of the other end should also have shiny copper color while the other half should be the color of the original insulation. Make sure that the coil was in the vertical position if the magnets are located at the bottom and at the top, and it was flat on the table if the magnets are on the sides. | |
| The coil is not balanced. | Take your time to balance the coil - it is very important. Well balanced coil should spin freely. Ideally it should stop in random positions. | |
| The battery is dead or battery voltage is low. | This motor consumes a lot of electricity and could drain the batteries quickly if the rotor is stalled. Replace the battery with the fresh one. | |
| Bad contact between battery holder wires and the stands. | Make sure that you removed the plastic insulation from the battery holder wires and make a tight connection. | |
| Batteries inserted incorrectly. | If you use 2 or more batteries in the battery holder make sure that they are inserted properly. Refer to the pictures in step 6. | |
| Incorrect orientation of the magnets. | If you use two magnets make sure that the North pole of one magnet faces the South pole of another magnet. | |
| Motor worked fine for a while but then stopped working. | The coil is not balanced. | The coil ends could be bent. Balance the coil again. |
| Bad contact between the coil ends and the stands. | When the motor works for a while the little spark between the coil ends and the stands creates a black deposit that prevents the current from passing through this connection, especially if you used higher voltages. Time to time you need to clean the ends of the coil, and the stands where they contact the ends, with the knife, fine sandpaper, or rubbing alcohol. Be careful not to destroy the remaining insulation on one of the coil ends. | |
| No insulation on both coil ends. | After some time the friction between the coil ends and the stands may rub off the insulation completely creating a short circuit. You should make a new coil. | |
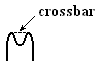
| The coil jumps off the stands too often. | The coil is not balanced. | Balance the coil. |
|
You may add a little crossbar to each of the stands that will prevent it from happening, using, for example, a little piece of wire.
|